Armeria w/ Zipkin
前回の Getting started Armeria w/ Spring Boot に続き、今回はZipkinによるトレーシング機能を紹介します。
おすすめ資料
まずは、以下のスライドを読んでみてください。
Zipkinの紹介やZipkin導入のメリットも說明されていて、Zipkin入門としても良い資料だと思います。
公式ドキュメント & 公式サンプルアプリケーション
Armeriaの公式ドキュメントには残念ながらまだ Zipkin integration の說明は記載されていません。
https://line.github.io/armeria/advanced-zipkin.html
その代わり、openzipkin-contribというOrganizationにzipkin-armeria-exampleというサンプルアプリケーションがあります。
https://github.com/openzipkin-contrib/zipkin-armeria-example
このzipkin-armeria-exampleも非常にシンプルでわかりやすいのですが、前回作ったarmeria-sandboxにZipkin integrationを追加してみました。
サンプルソースコード
前回と同じarmeria-sandboxというソースリポジトリです。
0.0.2というtagを付けておきました。
https://github.com/matsumana/armeria-sandbox/tree/0.0.2
今回使用したバージョン
前回は、Spring Boot + Spring MVC + Armeria という構成でしたが、Spring MVCでREST Serverを実装した場合Zipkinでのトレーシングが正しく取れなかったので、今回はSpring MVCを外して、Spring Boot + Armeriaという構成にしています。
(詳しく調べてませんが、自分でTraceしてデータをZipkinに送るロジックを書く必要があると思います)
- Java: OpenJDK (from Oracle) 11 build 28
http://jdk.java.net/11/ - Armeria: 0.70.1
- com.linecorp.armeria:armeria
- com.linecorp.armeria:armeria-spring-boot-starter
- com.linecorp.armeria:armeria-thrift
- com.linecorp.armeria:armeria-zipkin
- com.linecorp.armeria:armeria-retrofit2
- Spring Boot: 2.0.4.RELEASE
- org.springframework.boot:spring-boot-starter-validation (これが無いとアプリが起動できない)
- Thrift: 0.11.0
- thrift compiler (brewでインストール)
- org.apache.thrift:libthrift
- thrift-gradle-plugin: 0.4.0
- Retrofit: 2.4.0
今回作成したサンプルアプリケーションの構成

5つのアプリケーションに分かれています。
- Frontend
- Backend 1
- Backend 2
- Backend 3
- Backend 4
Frontendがブラウザからのリクエストを受付け、Backend 1〜3のAPIを順番に同期的にCallします。
また、Backend 3はBackend 4のAPIを更にCallしています。
コードの說明
armeria-sandboxを元にコード例を說明していきます。
1. Tracingを生成するFactoryクラス
brave.Tracingを生成するクラスはZipkinTracingFactoryです。
Armeriaでは、brave.TracingをHTTP/Thrift/gRPC Clinet, HTTP/Thrift/gRPC Serverそれぞれにdecoratorとして追加するだけで、Zipkinによるトレーシングを行ってくれます。とても簡単です。
また、副次的なメリットとして、Client-Server間の通信がHTTP/2になります。
2. HTTP/Thrift ServerそれぞれにTracingをdecoratorとして追加する
まずは、Server側のソースから。
REST Server, Thrift ServerでAPIの違いが少しありますが、Tracingを追加する箇所は大体同じです。
*TracingFactory#createにはサービス名を指定します。ZipkinのUI上で分類される単位になります。
2-1. Frontend (REST Server)
@Configuration
public class ArmeriaHttpServiceConfig {

    private final Tracing tracing;

    ArmeriaHttpServiceConfig(ZipkinTracingFactory tracingFactory) {
        tracing = tracingFactory.create("frontend");
    }

    @Bean
    public AnnotatedServiceRegistrationBean rootControllerRegistrationBean(RootController controller) {
        return new AnnotatedServiceRegistrationBean()
                .setServiceName("rootController")
                .setService(controller)
                .setDecorators(LoggingService.newDecorator(),
                               HttpTracingService.newDecorator(tracing));
    }

    @Bean
    public AnnotatedServiceRegistrationBean helloControllerRegistrationBean(HelloController controller) {
        return new AnnotatedServiceRegistrationBean()
                .setServiceName("helloController")
                .setService(controller)
                .setDecorators(LoggingService.newDecorator(),
                               HttpTracingService.newDecorator(tracing));
    }
}
2-2. Backend 1 (Thrift Server)
@Configuration
public class ArmeriaThriftServiceConfig {

    private final Tracing tracing;

    ArmeriaThriftServiceConfig(ZipkinTracingFactory tracingFactory) {
        tracing = tracingFactory.create("backend1");
    }

    @Bean
    public ThriftServiceRegistrationBean pingService(PingService.Iface service) {
        return new ThriftServiceRegistrationBean()
                .setPath("/thrift/ping")
                .setService(ThriftCallService.of(service)
                                             .decorate(THttpService.newDecorator())
                                             .decorate(LoggingService.newDecorator())
                                             .decorate(HttpTracingService.newDecorator(tracing)))
                .setServiceName("PingService")
                .setExampleRequests(ImmutableList.of(new PingService.ping_args()));
    }

    @Bean
    public ThriftServiceRegistrationBean helloService(HelloService.Iface service) {
        return new ThriftServiceRegistrationBean()
                .setPath("/thrift/hello")
                .setService(ThriftCallService.of(service)
                                             .decorate(THttpService.newDecorator())
                                             .decorate(LoggingService.newDecorator())
                                             .decorate(HttpTracingService.newDecorator(tracing)))
                .setServiceName("HelloService")
                .setExampleRequests(ImmutableList.of(new HelloService.hello_args("foo")));
    }
}
2-3. Backend 2 (Thrift Server)
@Configuration
public class ArmeriaThriftServiceConfig {

    private final Tracing tracing;

    ArmeriaThriftServiceConfig(ZipkinTracingFactory tracingFactory) {
        tracing = tracingFactory.create("backend2");
    }

    @Bean
    public ThriftServiceRegistrationBean pingService(PingService.Iface service) {
        return new ThriftServiceRegistrationBean()
                .setPath("/thrift/ping")
                .setService(ThriftCallService.of(service)
                                             .decorate(THttpService.newDecorator())
                                             .decorate(LoggingService.newDecorator())
                                             .decorate(HttpTracingService.newDecorator(tracing)))
                .setServiceName("PingService")
                .setExampleRequests(ImmutableList.of(new PingService.ping_args()));
    }

    @Bean
    public ThriftServiceRegistrationBean helloService(HelloService.Iface service) {
        return new ThriftServiceRegistrationBean()
                .setPath("/thrift/hello")
                .setService(ThriftCallService.of(service)
                                             .decorate(THttpService.newDecorator())
                                             .decorate(LoggingService.newDecorator())
                                             .decorate(HttpTracingService.newDecorator(tracing)))
                .setServiceName("HelloService")
                .setExampleRequests(ImmutableList.of(new HelloService.hello_args("foo")));
    }
}
2-4. Backend 3 (Thrift Server)
@Configuration
public class ArmeriaThriftServiceConfig {

    private final Tracing tracing;

    ArmeriaThriftServiceConfig(ZipkinTracingFactory tracingFactory) {
        tracing = tracingFactory.create("backend3");
    }

    @Bean
    public ThriftServiceRegistrationBean pingService(PingService.Iface service) {
        return new ThriftServiceRegistrationBean()
                .setPath("/thrift/ping")
                .setService(ThriftCallService.of(service)
                                             .decorate(THttpService.newDecorator())
                                             .decorate(LoggingService.newDecorator())
                                             .decorate(HttpTracingService.newDecorator(tracing)))
                .setServiceName("PingService")
                .setExampleRequests(ImmutableList.of(new PingService.ping_args()));
    }

    @Bean
    public ThriftServiceRegistrationBean helloService(HelloService.Iface service) {
        return new ThriftServiceRegistrationBean()
                .setPath("/thrift/hello")
                .setService(ThriftCallService.of(service)
                                             .decorate(THttpService.newDecorator())
                                             .decorate(LoggingService.newDecorator())
                                             .decorate(HttpTracingService.newDecorator(tracing)))
                .setServiceName("HelloService")
                .setExampleRequests(ImmutableList.of(new HelloService.hello_args("foo")));
    }
}
2-5. Backend 4 (REST Server)
@Configuration
public class ArmeriaHttpServiceConfig {

    private final Tracing tracing;

    ArmeriaHttpServiceConfig(ZipkinTracingFactory tracingFactory) {
        tracing = tracingFactory.create("backend4");
    }

    @Bean
    public AnnotatedServiceRegistrationBean rootControllerRegistrationBean(RootController controller) {
        return new AnnotatedServiceRegistrationBean()
                .setServiceName("rootController")
                .setService(controller)
                .setDecorators(LoggingService.newDecorator(),
                               HttpTracingService.newDecorator(tracing));
    }

    @Bean
    public AnnotatedServiceRegistrationBean helloControllerRegistrationBean(HelloController controller) {
        return new AnnotatedServiceRegistrationBean()
                .setServiceName("helloController")
                .setService(controller)
                .setDecorators(LoggingService.newDecorator(),
                               HttpTracingService.newDecorator(tracing));
    }
}
3. HTTP/Thrift ClientそれぞれにTracingをdecoratorとして追加する
*Server側と同じように、TracingFactory#createにはサービス名を指定します。ZipkinのUI上で分類される単位になります。
*HttpTracingClient#newDecoratorの第2引数には、リクエスト先のサービス名を指定します。
3-1. Frontend (REST Server)
@Component
public class HelloController {

    private final ApiServerSetting apiServerSetting;
    private final Tracing tracing;

    HelloController(ApiServerSetting apiServerSetting, ZipkinTracingFactory tracingFactory) {
        this.apiServerSetting = apiServerSetting;
        tracing = tracingFactory.create("frontend");
    }

    @Get("/hello/:name")
    public HttpResponse hello(@Param String name) throws TException {
        {
            final HelloService.Iface helloService = new ClientBuilder(
                    String.format("tbinary+h2c://%s/thrift/hello", apiServerSetting.getBackend1()))
                    .decorator(HttpRequest.class, HttpResponse.class,
                               HttpTracingClient.newDecorator(tracing, "backend1"))
                    .build(HelloService.Iface.class);
            final String ret1 = helloService.hello(name);
        }

        {
            final HelloService.Iface helloService = new ClientBuilder(
                    String.format("tbinary+h2c://%s/thrift/hello", apiServerSetting.getBackend2()))
                    .decorator(HttpRequest.class, HttpResponse.class,
                               HttpTracingClient.newDecorator(tracing, "backend2"))
                    .build(HelloService.Iface.class);
            final String ret2 = helloService.hello(name);
        }

        {
            final HelloService.Iface helloService = new ClientBuilder(
                    String.format("tbinary+h2c://%s/thrift/hello", apiServerSetting.getBackend3()))
                    .decorator(HttpRequest.class, HttpResponse.class,
                               HttpTracingClient.newDecorator(tracing, "backend3"))
                    .build(HelloService.Iface.class);
            final String ret3 = helloService.hello(name);
        }

        return HttpResponse.of("Hello, " + name);
    }
}
3-2. Backend 3 (Thrift Server)
@Component
public class HelloServiceImpl implements HelloService.Iface {

    private final ApiServerSetting apiServerSetting;
    private final Tracing tracing;

    HelloServiceImpl(ApiServerSetting apiServerSetting, ZipkinTracingFactory tracingFactory) {
        this.apiServerSetting = apiServerSetting;
        tracing = tracingFactory.create("backend3");
    }

    @Override
    public String hello(String name) throws TException {
        {
            final Retrofit retrofit = new ArmeriaRetrofitBuilder()
                    .baseUrl(String.format("http://%s/", apiServerSetting.getBackend4()))
                    .addConverterFactory(ScalarsConverterFactory.create())
//                    .addConverterFactory(JacksonConverterFactory.create())
                    .addCallAdapterFactory(Java8CallAdapterFactory.create())
                    .withClientOptions((uri, optionsBuilder) ->
                                               optionsBuilder.decorator(
                                                       HttpRequest.class, HttpResponse.class,
                                                       HttpTracingClient.newDecorator(tracing, "backend4")))
                    .build();

            try {
                final HelloClient helloClient = retrofit.create(HelloClient.class);
                final String ret = helloClient.hello(name).get();
            } catch (InterruptedException | ExecutionException e) {
                throw new RuntimeException(e);
            }
        }

        return "Hello, " + name;
    }
}
4. サンプルアプリケーションを動かして、ZipkinのUIでトレーシング結果を確認してみる
4-1. まず、Zipkinコンテナ、Backend 1〜4、Frontend全てを起動します
ZipkinはDocker Composeで起動できるようにしておきました。
コンテナ起動コマンドはREADMEを参照してください。
アプリケーションのビルドコマンドと起動コマンドもREADMEに書いてます。
https://github.com/matsumana/armeria-sandbox/blob/0.0.2/README.md
4-2. 次に、以下のURLにcurlやブラウザでリクエストしてください
http://localhost:8080/hello/foo
4-3. ZipkinのUIでトレーシング結果を確認できるようになります
http://localhost:9411/zipkin/
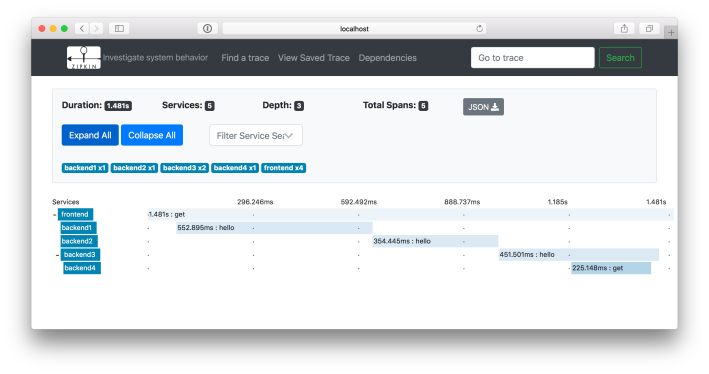
以下の画面が表示されると思います。

検索条件を指定して、Find Traceボタンをクリックすると、検索条件に合ったTraceが表示されます。

検索結果の行をクリックすると、Traceの詳細が表示されます。

API Callの順番と、それそれのAPIで実際にどのくらいの時間がかかったか確認できます。
まとめ
実際にサンプルアプリケーションを実装してみて、SeverもClientもArmeriaで統一すると、Spring MVCや一般的なHTTP Clinetを使う場合と比べて以下のアドバンテージがあることがわかりました。
- Zipkinによるトレーシングが簡単に行える
- Client-Server間の通信がHTTP/2になる
この2つはMicroservicesを実装する場合に、Armeriaの大きなアドバンテージになる思います。
(Thriftとの親和性や、Circuit BreakerもArmeriaの大きなアドバンテージですね)
次は、Prometheusを使ったメトリクス収集機能、Circuit Breakerのどちらかについて調べようと思います。