ArmeriaのCircuit Breaker
前回の Armeria w/ Zipkin に続き、今回はCircuit Breaker機能を紹介します。
公式ドキュメント
Armeriaの公式ドキュメントは以下です。
LINE Engineering Blogにも記事があります。
サンプルソースコード
前回と同じarmeria-sandboxというソースリポジトリです。
0.1.0というtagを付けておきました。
https://github.com/matsumana/armeria-sandbox/tree/0.1.0
今回使用したバージョン
- Java: OpenJDK (from Oracle) 11 GA (build 28)
- Armeria: 0.72.0
- com.linecorp.armeria:armeria
- com.linecorp.armeria:armeria-spring-boot-starter
- com.linecorp.armeria:armeria-thrift
- com.linecorp.armeria:armeria-retrofit2
- com.linecorp.armeria:armeria-rxjava
- com.linecorp.armeria:armeria-zipkin
- Spring Boot: 2.1.0.M4
- org.springframework.boot:spring-boot-starter-validation (これが無いとアプリが起動できない)
- Thrift: 0.11.0
- thrift compiler (brewでインストール)
- org.apache.thrift:libthrift
- thrift-gradle-plugin: 0.4.0
- Retrofit: 2.4.0
サンプルアプリを動かしてみる
Docker Composeで動くようにしてあります。
起動などのコマンドはREADME.mdに書いておきました。
https://github.com/matsumana/armeria-sandbox/tree/0.1.0#how-to-run-with-docker-compose
合計9個のコンテナが起動します。
Circuit Breakerの動作確認のため、Backend1は2台起動しています。
- Zipkin: 1台
- Prometheus: 1台
- Frontend: 1台
- Backend1: 2台
- Backend2: 1台
- Backend3: 1台
- Backend4: 2台
起動にはしばらくかかります。
Prometheusでアプリケーションのメトリックを取るように設定してあるので、Prometheusのtargets画面を見て全サーバのStatusがUPになっていれば起動完了です。
Prometheusのtargets: http://localhost:9090/targets
こんな感じ。

サンプルアプリの構成
以下のようになっています。

FrontendはREST APIを提供していて、ブラウザのリクエストを受けた後にBackend1〜3のThrift APIを非同期に実行します。
そして、Backend3はBackend4のREST APIをcallしています。
Zipkinで見てみる
以下のURLにリクエストしてみてください。
http://localhost:8080/hello/foo
以下のようなテキストのレスポンスが返ってきます。

Zipkinでトレーシング結果を見るとこんな感じです。
Backend1〜3が非同期にCallされているのがよくわかります。

Circuit Breakerの挙動を確認する
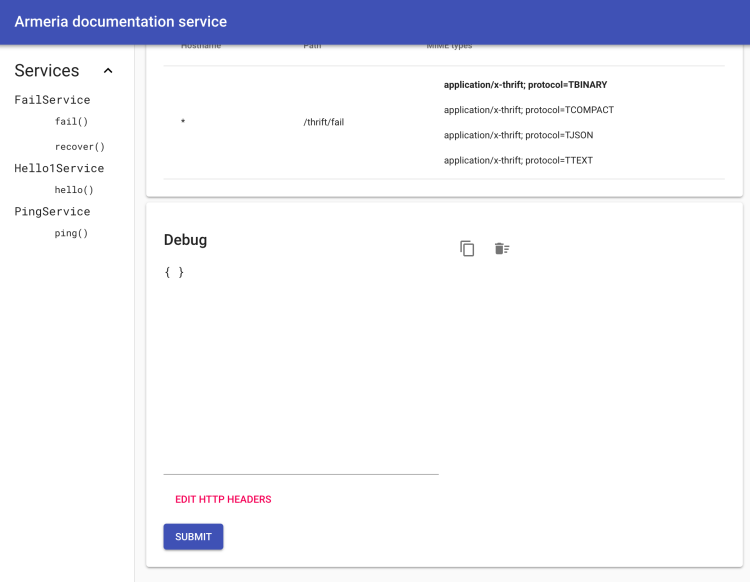
Backend1は2台起動しているので、1台だけThrift APIが例外をThrowするようにしてみます。
以下のURLをブラウザで開きます。
(ArmeriaのDocServiceです)
http://localhost:8081/internal/docs/#/methods/info.matsumana.armeria.thrift.FailService/fail

Thrift APIが例外をThrowする状態にするための FailService#fail() と、FailService#recover() を作っておきました。
submitボタンを押すと状態が切り替わります。
Circuit BreakerをOPEN状態にする
さて、以上でBackend1のThfirft APIが50%の確率でFailするようになりました。
ちなみに、エラーになったリクエストをZipkinで見るとこんな感じになります。
FailしたAPI Callは赤くなってますね。

Circuit Breakerの設定
このサンプルアプリでは、20秒の間にリクエストの10%が失敗するとCircuit BreakerがOPEN状態になるように設定しています。
ArmeriaのCircuit Breakerにはいくつか設定があるので、自分のアプリに合わせて設定が可能です。
公式ドキュメント: https://line.github.io/armeria/client-circuit-breaker.html#circuitbreakerbuilder
Circuit BreakerがOPEN状態な時のFallback処理
もう一度さっきURLにリクエストして確認してみましょう。
http://localhost:8080/hello/foo
ブラウザでリロードを繰り返すと、Circuit BreakerがOPEN状態になって
以下のようなレスポンスが返るようになります。

FrontendサーバのREST APIは以下のように実装しています。
@Get("/hello/:name")
public CompletableFuture<HttpResponse> hello(@Param String name) throws TException {
    final ExecutorService threadPool =
            Executors.newFixedThreadPool(50,
                                            new ThreadFactoryBuilder()
                                                    .setNameFormat("rxjava-executor-%d")
                                                    .build());
    final ExecutorService monitoredThreadPool = ExecutorServiceMetrics.monitor(Metrics.globalRegistry,
                                                                                threadPool,
                                                                                "rxjavaExecutor");

    // Convert to Single
    final ThriftCompletableFuture<String> future1 = new ThriftCompletableFuture<>();
    hello1Service.hello(name, future1);
    final Single<String> single1 = SingleInterop.fromFuture(future1);

    final ThriftCompletableFuture<String> future2 = new ThriftCompletableFuture<>();
    hello2Service.hello(name, future2);
    final Single<String> single2 = SingleInterop.fromFuture(future2);

    final ThriftCompletableFuture<String> future3 = new ThriftCompletableFuture<>();
    hello3Service.hello(name, future3);
    final Single<String> single3 = SingleInterop.fromFuture(future3);

    // Convert to Single<HttpResponse>
    final Single<HttpResponse> singleResponse = single1
            .doOnSuccess(res -> log.debug("hello1Service res={}", res))
            .doOnError(e -> log.debug("hello1Service exception", e))
            .onErrorReturn(e -> {
                if (e instanceof FailFastException) {
                    // fallback
                    return "[backend1 - fallback] Hello, ???";
                }
                throw new RuntimeException(e);
            })
            //
            .observeOn(Schedulers.from(monitoredThreadPool))
            .zipWith(single2, (res, res2) -> res + " & " + res2)
            .doOnSuccess(res -> log.debug("hello2Service res={}", res))
            .doOnError(e -> log.debug("hello2Service exception", e))
            .onErrorReturn(e -> {
                if (e instanceof FailFastException) {
                    // fallback
                    return "[backend2 - fallback] Hello, ???";
                }
                throw new RuntimeException(e);
            })
            //
            .observeOn(Schedulers.from(monitoredThreadPool))
            .zipWith(single3, (res, res2) -> res + " & " + res2)
            .doOnSuccess(res -> log.debug("hello3Service res={}", res))
            .doOnError(e -> log.debug("hello3Service exception", e))
            .onErrorReturn(e -> {
                if (e instanceof FailFastException) {
                    // fallback
                    return "[backend3 - fallback] Hello, ???";
                }
                throw new RuntimeException(e);
            })
            //
            .map(HttpResponse::of);

    // Convert to CompletableFuture
    final CompletableFuture<HttpResponse> futureResponse = new CompletableFuture<>();
    singleResponse.subscribe(futureResponse::complete, futureResponse::completeExceptionally);

    return futureResponse
            .exceptionally(e -> HttpResponse.of(HttpStatus.INTERNAL_SERVER_ERROR,
                                                MediaType.JSON_UTF_8,
                                                e.toString()));
}
ちょっと話がそれますが、REST APIのレスポンスはCompletableFutureで、Thrift APIのCallbackはThriftCompletableFutureです。
今回、APIをCallする部分はFutureではなくRxJava2で書きたかったので、Future <=> Reactive Streams の変換処理が必要でちょっと煩雑になってしまいました。。。
サーバサイドのReactive Streamsに興味がある人は以下の2つをどうぞ。
話を戻します。
ArmeriaのCircuit BreakerのFallback処理はここです。
.onErrorReturn(e -> {
    if (e instanceof FailFastException) {
        // fallback
        return "[backend1 - fallback] Hello, ???";
    }
    throw new RuntimeException(e);
})
OPEN状態だと、FailFastExceptionが返ってきます。APIはCallされません。
FailFastExceptionをハンドリングすればFallback処理を実装できます。
ついでに、OPEN状態だとAPIはCallされないっていうのをZipkinで確認してみましょう。

確かにトレーシング結果にbackend1のCallがありませんね。
Circuit Breakerのメトリックを確認する
ArmeriaはCircuit Breakerに関するメトリックとして以下が取れます。
- armeria_client_circuitBreaker_requests
- armeria_client_circuitBreaker_transitions_total
- armeria_client_circuitBreaker_rejectedRequests_total
サンプルアプリでは、Prometheusでメトリックを収集するように設定済なので確認してみましょう。
以下のURLをブラウザで開いてみてください。
http://localhost:9090/graph?g0.range_input=30m&g0.expr=armeria_client_circuitBreaker_requests&g0.tab=0&g1.range_input=30m&g1.expr=irate(armeria_client_circuitBreaker_transitions_total%5B1m%5D)&g1.tab=0&g2.range_input=30m&g2.expr=irate(armeria_client_circuitBreaker_rejectedRequests_total%5B1m%5D)&g2.tab=0
以下のようなChartが見れると思います。


まとめ
アプリケーションにCircuit Breakerの設定とFallbackの実行を行い、Circuit Breakerの挙動とメトリクスを確認しました。
マイクロサービスを実装する場合、Circuit Breakerは必須だと思いますが、フレームワークに標準で組み込まれていて簡単に使えるのはとても便利だと思います。
次は、Automatic retry、ThrottlingService、Service discovery with ZooKeeperあたりを試したいと思います。